Description
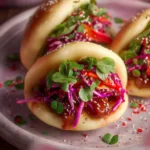
Delicious and fluffy bao buns filled with charred gochujang chicken and fresh slaw.
Ingredients
Scale
- 350g (2 ⅓ cups) all-purpose flour
- 2 teaspoons instant yeast
- 2 teaspoons baking powder
- 1 teaspoon salt
- 2 tablespoons neutral oil (vegetable, canola, or peanut oil)
- 180g (approximately ¾ cup) lukewarm water
- 3 tablespoons sesame oil, for brushing
- 500g (1lb) boneless, skinless chicken thighs (ideally free-range)
- 1 tablespoon gochujang paste
- 1 tablespoon soy sauce
- 1 tablespoon rice vinegar
- 1 tablespoon sweet chili jam (plus more to serve)
- ¼ head red or white cabbage, thinly sliced
- ½ cucumber, finely diced
- 3 scallions (spring onions), finely sliced
- A handful of cilantro (coriander) leaves
- 1 tablespoon sesame seeds
- ½ teaspoon salt
- 1 tablespoon rice vinegar
- ½ tablespoon sesame oil
- 1 teaspoon fish sauce
- ¼ cup egg-free garlic aioli (or two-minute gochujang aioli)
- ¼ cup sweet chilli jam
- 1 tablespoon sesame seeds
- A handful of cilantro (coriander) leaves, chopped
- Rolling pin
- Parchment paper for lining
- Steamer – either a bamboo steamer or any standard steaming basket
Instructions
- In a large bowl, combine 350g (2 ⅓ cups) all-purpose flour, 2 teaspoons instant yeast, 2 teaspoons baking powder, 1 teaspoon salt, 2 tablespoons neutral oil, and 180g (¾ cup) lukewarm water. With a large spoon, stir to combine until a rough, shaggy dough forms. Use your hands to bring it together into a ball. Give it a couple of quick kneads in the bowl to scrape up any leftover bits of flour, then turn it out onto a lightly floured surface.
- With the heel of your hand, push the dough away from you, then fold the part you just pushed away back on itself, give the dough a quarter turn, and repeat this motion. Continue like this for about five minutes. You’ll start to feel the texture of the dough changing – what was a little rough will become smooth and supple. At this point, you’re ready to shape your bao. You can also do this in a stand mixer with the dough hook attached if you have one.
- Cut out 12 small squares of parchment paper, about 5cm squared. Alternatively, you can line the entire steamer basket. To do that, cut a piece of parchment paper into a circle that will fit inside your steamer. Fold it in half, then in half again, then make 5 small cuts along the folded edge. When you unfold it, you’ll have created a perfect liner with holes for steam to get through. Pop it inside the steamer. You must line your steamer or your bao buns will stick to it and you’ll make a mess.
- Roll the dough into a log, about 12 inches long. Divide the log into 12 equal pieces – if you want to get exact, you can use a scale (each piece should weigh roughly about 1 oz or 50g). Working with one at a time, and covering the other pieces of dough with a clean kitchen towel (this is to stop them drying out), shape a piece into a small ball.
- Gently flatten a ball into a small oval and use a rolling pin to roll the dough into an oval shape, about 3 inches or 8cm long and ¼ inch thick. Brush the exposed side with sesame oil, then fold it onto itself. Place on a little square of parchment paper (or into the lined steamer straight away), then put into the steamer, leaving about an inch between each bun so they don’t stick together. Repeat with the remaining pieces of dough.
- At this point, the dough needs to rest for about 30 minutes to puff up and rise a little. I like to take a photo on my phone of the bao as I place them in the steamer, so it’s easy to compare and see how they’re going.
- After 30 minutes, they should look a little more puffy. Now it’s time to cook them. Bring a large pot of water to a boil (I boil the kettle and pour that into a pot for ease). Place the steamer on top of the pot and let it steam for 12 minutes, until the buns puff up beautifully and look lovely and glossy. They’re now ready to fill.
- Heat your oven to 450°F (250°C) fan and line a baking sheet with parchment paper. In a bowl, add 1lb of diced chicken thighs, 1 tablespoon of gochujang paste, 1 tablespoon of soy sauce, 1 tablespoon of sesame oil, 1 tablespoon of rice vinegar, and 1 tablespoon of sweet chili jam, and toss to coat the chicken thoroughly.
- Transfer the chicken to the lined baking sheet and spread it into a single layer. Pop into the oven for 20 minutes, until lovely and charred around the edges. You can also do this in the air fryer. Air fry for 10 minutes at 400°F (200°C).
- While the chicken cooks, add the sliced cabbage, scallions, cucumber, and 1 tablespoon of sesame seeds to a bowl. Pour over 1 tablespoon of rice vinegar, ½ tablespoon of sesame oil, 1 teaspoon of fish sauce, and ½ teaspoon of salt. Toss to combine well.
- Spread a little aioli onto the base of each bao bun and top with a generous spoonful of the slaw. Arrange a couple of pieces of the charred gochujang chicken on top, then drizzle with the remaining chili jam. Finish with another scattering of sesame seeds and cilantro.
Notes
- This recipe yields approximately 12 bao buns.
- The resting time allows the dough to rise, resulting in a fluffier texture.
- You can customize the filling with other proteins or vegetables as desired.
- Prep Time: 60 minutes
- Cook Time: 20 minutes
- Category: Main Dish
- Method: Steaming, Baking
- Cuisine: Asian
Nutrition
- Serving Size: 1 bun
- Calories: 250
- Sugar: 5g
- Sodium: 600mg
- Fat: 12g
- Saturated Fat: 1g
- Unsaturated Fat: 11g
- Trans Fat: 0g
- Carbohydrates: 29g
- Fiber: 1g
- Protein: 10g
- Cholesterol: 70mg